Robot Challenge 3
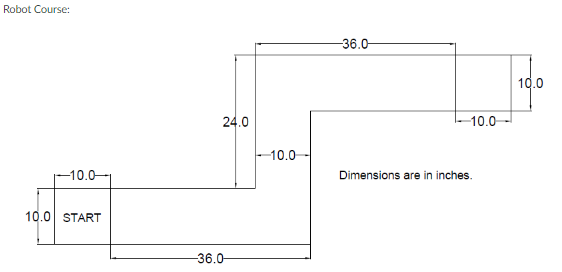
Challenge 3 seemed to be very similar to Challenge 2 since they used the same maze, but Challenge 3 required us to use a distance sensor so the robot could figure out when to turn on its own. For this challenge, our task was to have a button or switch to turn on the robot, Operate autonomously using sensors included in the Sparkfun kit, have our robot turn left and right, have it turn within a 10” boundary without going over the tape, and make sure it stops at the end of the course. We also had a second task for this challenge, which was to create our own modular maze with these requirements: The maze has at least three turns and no more than five, the walls are at least 6 inches tall, the walls can be sensed by the sensors, can be configured in 2 minutes or less, and is 10 inches wide at its narrowest part.
Day 11/15
Beginning of challenge 3
Today we are hoping to fully finish challenge 3, but before that, we have a few other things to do. First, we plan to add the distance sensor to our robot. Then we are going to get the program from our saved program list in Arduino to get an idea of how to use the distance sensor. With this, we hope to get the robot to run through the maze successfully
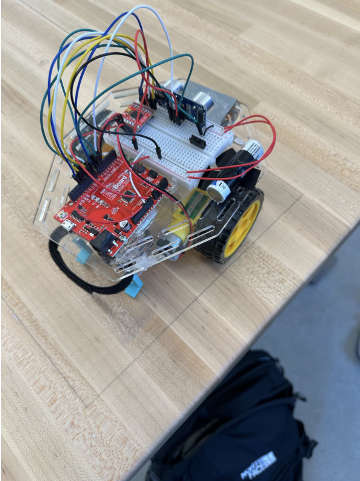
Angled view of our robot

Top view of our robot
In the end, we created a new code and added the distance sensor to the robot. But our robot didn’t want to work with us and constantly veered right. We were able to get a working code that turned when faced with a wall. But because the robot veered right, we weren’t rushing to do any testing because we knew it wouldn’t run all the way through, so we stopped there.
Day 11/19
finishing challenge 3
We are hoping to finally finish challenge 3 today. We are hoping to do this by fixing the turning of our robot by adding weight. If that doesn’t work then we will up the speed of one of our motors. We hope that with this our robot will run through fully.

Finalized Flow Chart
Above is a video of our successful attempt
Today, we added the batteries to the right side of the car and also had to increase the speed of our right motor because it was veering towards the right no matter what, but after these fixes we were able to get a successful trial of our robot.
Above is a video of one of our many failed attempts
Maze building
Below is the second task of challenge 3 being the maze building which we decided to complete after our robot successfully made it through the maze

Above is our rough sketches of three possible maze designs

Here, we used the kepner-tregoe decision analysis to test our three maze designs to see which is the best based on the requirements.

Lastly, this is the maze design that scored the highest on the Kepner-Tregoe decision analysis drawn on Autocad.
This challenge had its challenges. By far, the worst was the robot veering right no matter what we did. It was evident that the left wheel was getting more traction than the right, but we couldn’t figure out why. We put more weight on the right side to try to give it traction, but that didn’t seem to do much. We settled with increasing the right wheel's motor speed since we couldn’t fix the floor's low traction.
Challenges
and
Reflection
During Challenge Three, our group had to persevere through a decent amount of adversity; however, in the end, we were able to push through and finish on time; our main issue was the fact that we had a hard time figuring out how to balance the robot correctly so that it would drive straight, after a while we were able to make it go straight by adjusting the speed of the individual motors, we also had to design our maze, we decided to try and create one based off of a spiral. One problem that I suspect we will encounter in the next challenge is that in completing this challenge, we had it so that the robot was programmed specifically for the maze we were given and not any possible maze, so we will have to adjust it then.
